You may notice that you are unable to upload images to WordPress at times. There will be image placeholders that are broken. You will notice that all images have disappeared and you are unable to view any images. This Image Upload Issue in WordPress appears in the media library and the media uploader for pages and posts.
This image upload issue is a very common WordPress error, but it is fortunately very simple to resolve. In this article, I’ll show you how to fix WordPress’s image upload problem.
What Causes The Image Upload Issue in WordPress
In most cases, the image upload issue in WordPress is caused by wrong file permissions. WordPress files are saved on your website hosting server and require specific file and directory permissions to function properly.
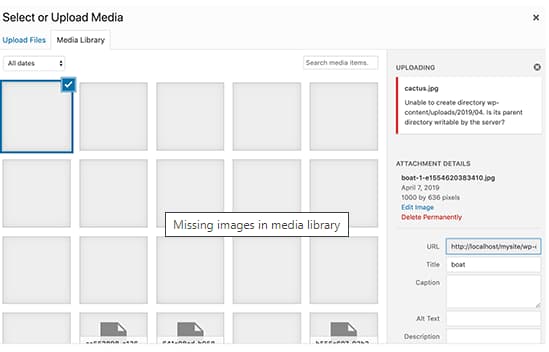
WordPress is unable to read or upload files on the hosting server due to incorrect file permissions. When uploading an image file, you may receive the following error:
‘Unable to create directory wp-content/uploads/2019/04. Is its parent directory writable by the server?’
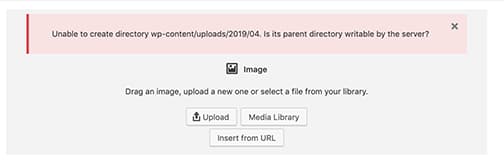
Or, you might see the error ‘The uploaded file could not be moved to wp-content/uploads/’.
Now your innocent mind will wonder, if my site was working before, why isn’t it working now?
This could occur for a variety of reasons. If you use shared hosting, you may encounter this error more frequently. It is preferable to obtain a VPS or dedicated server.
Your hosting provider may perform system updates that affect file permissions. Or your webmaster inadvertently changed file permissions to incorrect permissions.
Fixing Image Upload Issue in WordPress
In order to fix the Image Upload Issue in WordPress, the files and folder permissions of /uploads need to fix. To change WordPress permissions, you must use an FTP client.
To begin, connect to your website via an FTP client such as FileZilla.
Navigate to your WordPress installation’s /uploads folder; this folder is located in the /wp-content folder.
Select “File permissions” or “CHMOD” from the context menu when you right-click on /uploads (depending on your FTP client).
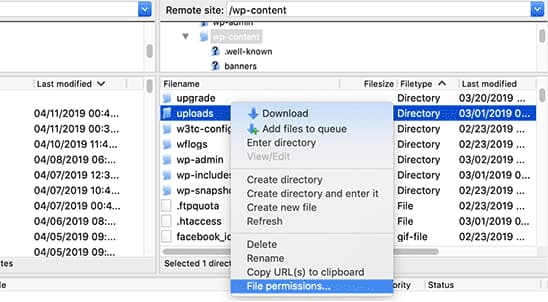
The File Permissions dialog box will appear.
First, we’ll set the file permissions to 744 for the /uploads directory and all of its subdirectories. To accomplish this, enter 755 in the numeric value box and check the box next to the Recurse into subdirectories option. Now, select the ‘Apply only to directories’ radio button.
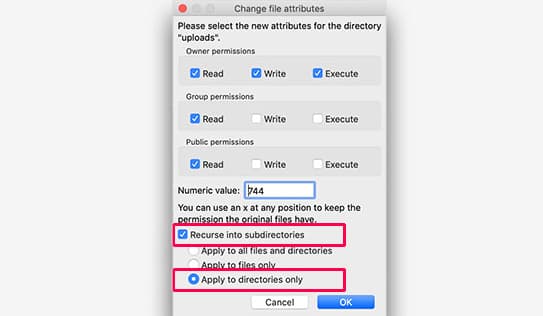
Select the “OK” button. Your FTP client will begin applying the new file permissions to all folders in the /uploads directory. This procedure may take some time.
Note: If changing directory permissions to 744 does not resolve your issue, try 755.
Now we’ll change the permissions on all files in the /uploads directory. The procedure is basically the same as explained above. Right click on /uploads directory and select file permissions. Change the numeric value in the file permissions dialog box to 644.
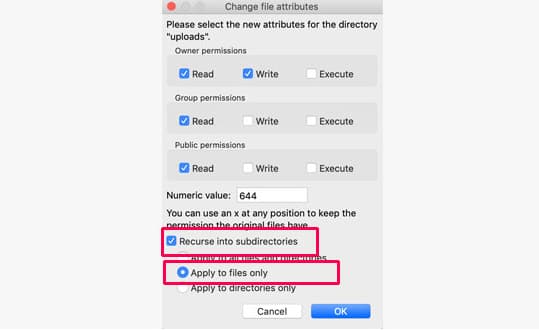
Select the Recurse in the subdirectories checkbox. Finally, select the ‘Apply to files only’ radio button. To save these changes, click the OK button.
Your FTP client will begin applying the new file permissions to all files including images in the /uploads directory. This procedure may take some time.
NOTE: If you don’t know how to use an FTP client, you can use your hosting control panel’s file manager.
Log in to your WordPress admin area once you’ve completed the full process. Check out the WordPress media library. I hope your Image Upload Issue in WordPress is resolved now. However, if this is still not appearing, contact a WordPress expert or your hosting provider. Also, check out these details guide about all WordPress common image issues.
Please keep in mind that different FTP clients may have different methods for setting file permissions. It is critical that you use the proper permissions for your WordPress installation. Consult the WordPress documentation or your hosting provider if you’re unsure about which permissions to use.


